A beginner's guide for adding external textures to a hex in LnzPro, to ensure your petz textures look how they are intended to!

Location
The first step in applying an external texture is to know where the bmp image is saved on your computer. If you are hexing a dog, the texture should typically be placed inside your Ubisoft
* \Petz 4** \Resource\Dogz folder; if you are hexing a cat, it should go in \Resource\Catz.
* or P.F. Magic** or Petz 3 or Petz 5
LnzPro or Petz Workshop?
Unless you are an experienced or long-time hexer (though those who are aren't likely to need this tutorial), you're probably hexing primarily in Petz Workshop. That's fine!
However - one thing you never want to do in PW is try to add new textures with Petz Workshop's import texture feature. I think what happens is it tries to convert the texture to the petz palette, but since the palette changes on different computers (especially older vs newer computers) it usually ends up distorting your texture colors and lowers the quality. This might not be noticeable for bright color textures, but it badly affects semi-transparent and many PKC textures which are made to use specific colors in the palette.
Petz does a really good job of translating colors to its palette on its own, though, so you can avoid the whole issue by learning to link your textures with LnzPro!
(Both hexing programs can be downloaded at Sherlock Software if you don't have them already.)
Step 1: Find the [Texture List]
First open your chosen .DOG or .CAT breedfile in LnzPro.
In the left pane, click the + sign next to LNZ, and then the first option under that (a two letter abbreviation for the breed, I'm using the Calico so for me it would be 'CA') - you're now in the Adult Lnz portion of the breedfile, where most hexing happens.
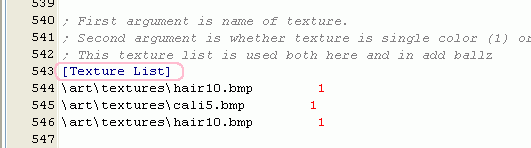
Scroll down until you find the heading [Texture List] - it's usually close to the bottom, just above [Ballz Info]
Step 2: Add a New Texture
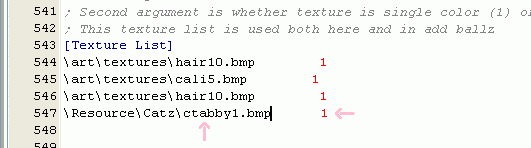
See the rows directly below where it says [Texture List]? These are the textures that the breed already uses, each line links to a single one. To add a new one, simply add a new line at the bottom and type in the location and file name of your texture.
Step 3: Set your Texture's Transparency
That red number directly after the texture filename is the transparency setting. This number tells the game how it should show the texture on your pet.
Transparency set at
0 makes the texture non-transparent. With this setting the game will show the texture as is and completely hides the color of the balls/addballs/paintballs that it's applied to. Most bright and artistic textures meant for normal hexing use this setting.A number
1 makes it transparent or fully transparent, which means it will only use the light and dark value of the texture, overlaid on the color of the balls/addballs/paintballs beneath it. The original breeds with solid color coats all get their fur texturing from fully transparent textures.Textures that are semi-transparent use any other number in the petz palette. In these textures, part of the original bmp will show unchanged, and part will become the color of the underlying balls/addballs/paintballs. Just look at your texture and see what petz palette colors are present in it - if there are some brown areas, you can put any number between 90-99 to make those brown areas transparent. Many textures meant for PKC are semi-transparent so they can be used with multiple color combinations.
Website, content © Amanda @ Cargo 2020
Petz by P.F. Magic
